

Hamilton Beach Breakfast Sandwich Maker with Egg Cooker Ring, Customize Ingredients, Perfect for English Muffins, Croissants, Mini Waffles, Perfect White Elephant Gifts, Red (25476)
内部产品


From the manufacturer

Forget the fast food drive-through.
With the Hamilton Beach Breakfast Sandwich Maker, you can enjoy a hot, homemade breakfast, lunch, or dinner sandwich in minutes using your own fresh ingredients.


Hamilton Beach products are thoughtfully designed to make your life easier. We use consumer insights, in-depth research and rigorous testing to deliver the best solution to your everyday needs.
Whether it's preparing delicious meals and beverages effortlessly, or making your clothes look their best, you can count on the brand that has spent over 100 years creating products with you in mind.
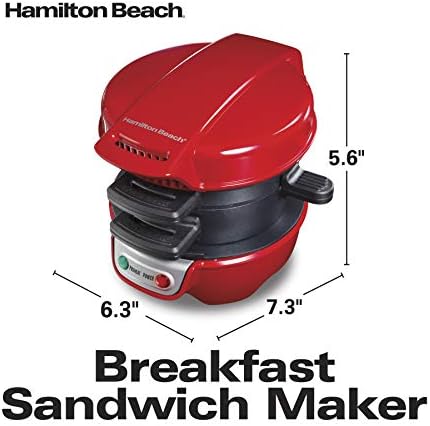
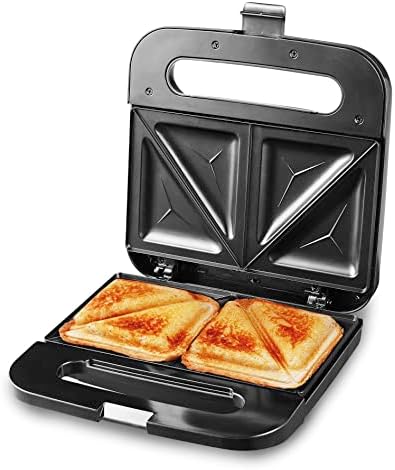
Hamilton Beach Breakfast Sandwich Maker
Make hot, hearty breakfast, lunch, or dinner sandwiches in 5 minutes or less!
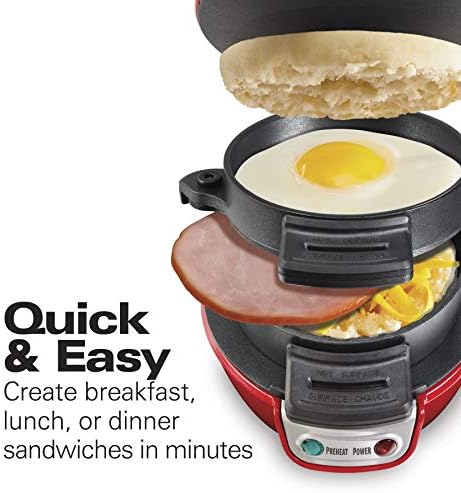
Simply build the base of your sandwich in the bottom layer, place the egg and your sandwich’s top layer on the upper cooking plate, and close the lid.
In just five minutes, your breakfast sandwich is ready to eat. Explore more than 25 sandwich recipes on our website, from the traditional egg, ham, and cheese to more unique options like cheddar, apple, bacon, and egg croissant sandwich. All removable parts are dishwasher safe; surfaces are covered with durable, nonstick coating.
- Make a hot and hearty breakfast sandwich at home, ready to eat in 5 minutes or less
- Use your own fresh ingredients, including eggs, cheese & precooked meat
- Cooks every layer of your breakfast sandwich to perfection
- Cooking plate cooks a fresh egg perfectly, then slides out to assemble your sandwich
- Make sandwiches with English muffins, biscuits, small bagels, and more
- All removable parts are dishwasher safe and surfaces are covered with durable, nonstick coating
Features:
![]()

![]()

![]()

Quick and Easy
Easily create a breakfast, lunch, or dinner sandwich. Perfect for brunch or a quick meal on the go.
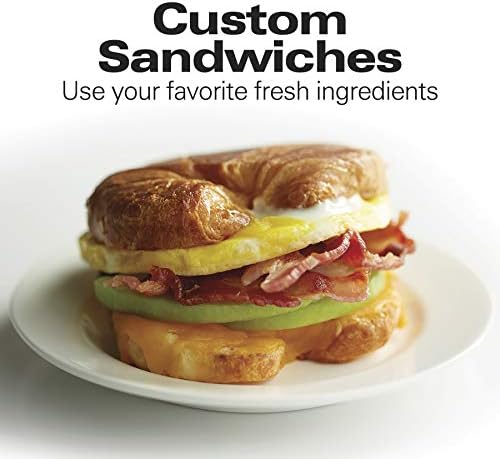
Use Your Own Fresh Ingredients
Customize your sandwich with your favorite bread, cheese, eggs, meats, and much more.
Get Inspired
Explore more than 25 sandwich maker recipes on our website.
![]()

![]()

![]()

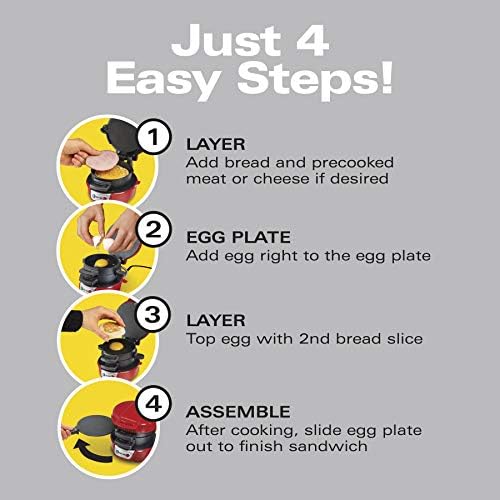
Just 4 Easy Steps!
Simply 1) add bread and precooked meat or cheese to the bottom cooking plate. 2) Crack an egg into the upper egg plate, then 3) layer the second piece of bread on top of the egg and close the lid. 4) Once your sandwich is done cooking, just slide the egg plate out to assemble the sandwich.
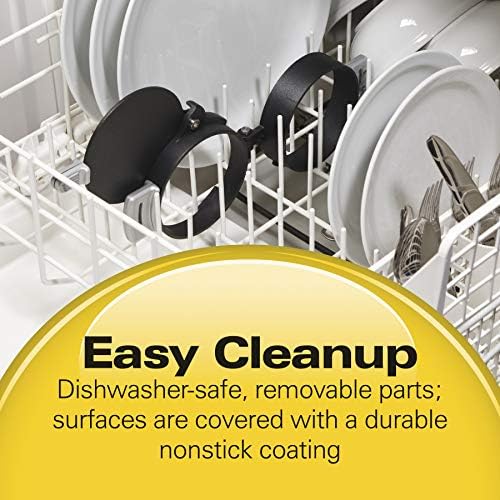
Easy Cleanup
All removable parts are dishwasher safe; surfaces are covered with durable, nonstick coating.
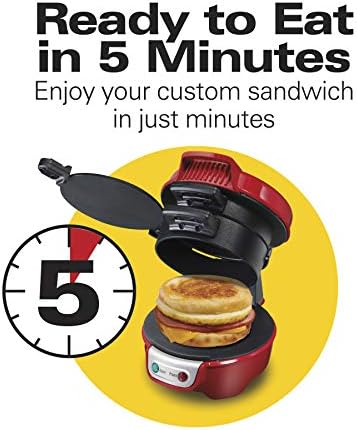
Ready to Eat in 5 Minutes
Enjoy your custom sandwich in just 5 minutes!


 Breakfast Sandwich Maker
Dual Breakfast Sandwich Maker with Timer
Breakfast Sandwich Maker
Breakfast Sandwich Maker
Customer Reviews
4.4 out of 5 stars
42,710
4.6 out of 5 stars
23,909
4.4 out of 5 stars
42,710
4.4 out of 5 stars
42,710
Price
$29.65 $42.99 $29.99 $29.99
Timer with audible tone
✓
Color
Silver Silver Red Black
Quick and easy recipes included
✓
✓
✓
✓
Number of sandwiches at a time
1 2 1 1
Dishwasher safe removable parts are
✓
✓
✓
✓
Breakfast Sandwich Maker
Dual Breakfast Sandwich Maker with Timer
Breakfast Sandwich Maker
Breakfast Sandwich Maker
Customer Reviews
4.4 out of 5 stars
42,710
4.6 out of 5 stars
23,909
4.4 out of 5 stars
42,710
4.4 out of 5 stars
42,710
Price
$29.65 $42.99 $29.99 $29.99
Timer with audible tone
✓
Color
Silver Silver Red Black
Quick and easy recipes included
✓
✓
✓
✓
Number of sandwiches at a time
1 2 1 1
Dishwasher safe removable parts are
✓
✓
✓
✓
Product information
Special Feature Manual Color Red Material Plastic Brand Hamilton Beach Product Dimensions 8"D x 8"W x 10"H Wattage 6.5E+2 Item Weight 3 Pounds Included Components Breakfast Sandwich Maker Style Sandwich Maker Voltage 120 Material Type Free Raw Meat Free Number of settings 1 Warranty Type full warranty Cable Length 5.25 Inches Global Trade Identification Number 00040094254767 UPC 040094254767 Manufacturer Hamilton Beach Item Weight 3 pounds ASIN B00C95O3HK Country of Origin China Item model number 25476 Customer ReviewsWarranty & Support
Manufacturer’s warranty can be requested from customer service. Click here to make a request to customer service.Feedback
-

Mark Schuster Jr.
29-08-2024About six months ago I purchased my first sandwich maker as an impulse buy.I'm a bit of a gadget guy so i succumbed to the impulse.My usual weekly routine was to stop by the McD's on my way to work and buy a McMuffin with egg or sausage each day. The coffee comes with me from home, so its a single purchase stop.My first attempt at making a sausage sandwich at home was mediocre at best when compared to my drive through experience.The issues were;1. The muffin was too small and did not contain the egg and sausage properly.2. The egg stuck to the maker leaving a mess to clean up.3. The egg leaked a bit around the sliding plate making a small mess.4. The precooked sausage and Canadian bacon was not heated properly.5. The egg was tough from over cooking.After a bit of experimenting all the issues were solved and I have been enjoying breakfast sandwiches each morning, and know whats in them.Here is what I learned.The first problem of too small a muffin was solved by carefully selecting which brand you buy.From my experience, the cheaper the muffin, the smaller it is.You want a full size muffin that will fill the makers cooking chamber.Since I live down the street from a restaurant supply company, I buy my muffins there.They are full size and come in 10 packs.Surprisingly, they are cheaper per muffin than my local grocery store.The next problem was solved by giving the egg cooking chamber a spritz of cooking spray after preheating the maker.This means the sliding plate as well as the sides of the ring.I use an olive oil based spray I get at the local Wally World.No more sticking and torn eggs.The leaking was solved by first preheating the maker a little longer.I plug it in first and then go get my ingredients.The extra minute or two of preheat after the green light turns on makes a difference.Another thing that helped was the cooking spray.I apply it when the maker is hot.This seems to make a seal between the plate and ring.The sausage not being hot enough was solved by not using a frozen patty or bacon slice.I now keep the ingredients in the refrigerator so they are cold, but not frozen.This change eliminated the issue completely.Again I have found the best deal on the ingredients at my local restaurant supply, but the Wally World sometimes beats them.If you buy a big package, just take a weeks worth and put them a plastic bag in the refrigerator and keep the rest in the freezer.Finally the tough egg.This issue was a show stopper for me.I hate tough eggs and not solving the problem meant the maker was getting returned.It turns out the solution was rather simple.Preheat the maker a bit longer as mentioned earlier and shorten the cooking time to 3 minutes.The result is a perfect egg (for me) with the rest of the sandwich thoroughly heated.Clean up was a breeze after using the cooking spray.I remove the cooking rings and wipe down with a damp cloth or place in the dishwasher.The maker body gets a quick wipe down and that it.If you are a bit adventurous, try making lunch or dinner sandwiches by substituting the breakfast meat with corned beef or pastrami from the deli.In the egg chamber place a thin slice of onion and a bit of swiss cheese.After six months, I am thoroughly satisfied.In fact I have bought a second so I have one at home and one to take with me for my regular extended hotel stays required by my job.The cost savings was amazing.This product paid for itself after two weeks just in drive through savings.Good Job Hamilton Beach.Since my initial review, I have found one more trick to using this product.If you load the maker as recommended, you will have the cheese against the egg.This makes the egg want to slide aroundon the meat especially just after cooking.I now place the cheese between the bottom muffin and meat.Problem solved.Another tip for those using it in a hotel room or at work, I have found that Wally World sells small bags of pre diced onions, bell Peppers and jalapenos.I keep some in my hotel room fridge and instead of a plain egg, I will scramble and add some veggies.Either zap the veggies for a moment to defrost first or just not keep them in the freezer.To mix things up a bit, I have been using sour dough, wheat, and cinnamon raisin breads instead of English muffins.The rings make a great "cookie cutter" when pressed into the bread slice.After shaping the bread I spread a small amount of butter on the side of the bread contacting the heating surfaces.The result is a nice crunch!Try spreading a bit of pesto on the other side for a savory treat.Use little to no butter when using pesto otherwise it gets a bit soggy.My favorite is sour dough, pesto, havarti cheese, sliced roast beef, and shaved onions.Heavenly lunch/dinner sandwich!Have had a few questions on my comment regarding the size differences in english muffins.In my experience the ones I buy at a restaurant supply arelarger and usually cost less per muffin than those I get at the grocery.To compare, I have uploaded a photo of each loade
-
Prof. Tatum Crist
29-08-2024I absolutely love this sandwich maker. It works best with English muffins, not so well with home made biscuits. I wanted to try with bagels, but it's hard to find bagels small enough to fit. That's ok, I am completely OK with English muffins. One morning I'll add my own bacon, cheese, then egg. Another morning I'll add ham or a sausage patty, then cheese & an egg. Add ingredients, set a timer for 5 mins, and there you got a great breakfast sandwich, hot & ready to eat. If I had a complaint, it would be that I can't do two at once. Did I mention I love this thing? Don't overthink it...buy yourself one and see for yourself! Simple to use, easy to clean, and I'll never visit McDonalds again. The only thing that kept me going there was their Egg McMuffins. Now I make my own, and I think they're better anyway...and definitely cost less!
-
Itzel Daniel
29-08-2024Hamilton Beach Breakfast Sandwich Maker with Egg Cooker Ring, Customize Ingredients, Perfect for English Muffins, Croissants, Mini Waffles, Dorm RoomThe sandwich maker comes packaged in a retail box with photos and descriptions from the manufacturer on the outside. Opening the box, the instructions are right on top, always a plus. The sandwich maker is padded in styrofoam, which disappoints me a little. In my area. You cannot recycle styrofoam, and I know that many manufacturers are switching to a molded cardboard packing material which is recyclable pretty much everywhere.Looking at the device itself, each layer is padded with a piece of foam to keep it safe during shipping. The individual ring pieces that hold your breakfast sandwich are all coated with the black Teflon-style coating that we're all familiar with. The center ring is removable for cleaning.I've had one of these machines before, and liked it quite a bit. With my older machine over time, the Teflon started flaking off, especially on the joint pieces or the plates stacked. I'm hoping with the newer style, that they fix this problem. With the updated hinge arrangement on the centerpiece, so that it snaps back into the machine better. There is a spring-type metal conduit covering the power cord between the top and bottom, as the top piece heats up as well as the bottom piece. Because of the way the electrics are designed on this, you cannot immerse the entire unit to clean it, you have to wipe the upper and lower plates clean and the centerpiece does come out for washing. You can wash the centerpiece in the sink or put it through the top rack of your dishwasher.Taking a look at the instructions, not much has changed from my earlier unit. They do have a little sheet in there giving you quick start instructions and recommendations for best results. They do recommend that you use a non-stick cooking spray on the plates so that your food won't stick to it.When powering up the machine, the red light will come on in front of the cooker and indeed is labeled power, so that you know you're plugged in. To it, that will come on when the machine is heated up to the proper temperature. For best results, you need to preheat this before setting your sandwich makings inside. Then once you've set your bread, eggs, and meat in place, close the unit, wait 5 minutes, and you're done. Done. A hot, fresh, breakfast sandwich for your enjoyment. I've noticed that they have a newer model that does two breakfast sandwiches at once, for larger families. Has a timer built into it, which I think would be beneficial if they could work a timer into the single unit as well, so it saves you from having an extra piece on your countertop in the kitchen.


![C CREST [10 Pack] Glass Meal Prep Containers, Food Storage Containers with Lids Airtight, Glass Lunch Boxes, Microwave, Oven, Freezer and Dishwasher Safe](https://www.ygtkshop.com/public/uploads/household/household6/108_B07R8BQD66.jpg)